
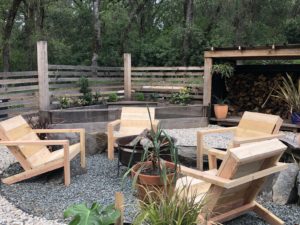
This past week I started working on my first build project for the Spring One Room Challenge. This is the first ORC I am participating in and we are redoing the bridge to our house and building a new beach area by the creek.
When I started the project I knew right away that I wanted stylish and comfy Adirondack chairs. I looked everywhere to find chairs that I liked the design of, and that would not break the bank. In the end, I could not find anything that fit the bill, so I started looking for plans to build my own. Again I hit a dead end because I was not in love with any of the designs available in the plans. So…

I decided to go ahead and design and build my own. So I headed to my workshop aka my front porch and started piecing my designs together. I knew what I wanted the look to be, but had to figure out all of the measurements and angles to make it work.
It took me a few hours and putting together and taking apart the first chair approx. 237 times to nail it down. My goal was to get the cuts figured out so that I could just cut all the lumber for the remaining three chairs and put them together assembly style.

So if you are like me and looking to have your very own modern Adirondack chairs I have put together a full tutorial for you to get started. The best part is that each chair only costs around $50 to build (not including paint or stain) but when you look at buying a comparable chair they are close to $200 apiece.
PREPARE
What you will need:
- Miter saw
- Table saw
- Impact driver
- Tape measure
- Marking pencil
- Level
Material List:

Cut guides:
BUILD
To make the build process go faster you can pre-cut all of your lumber and then use the steps below to put it together. Or if you prefer you can cut the lumber needed for each step if you don’t want to have to worry about labeling and checking measurements for each piece, I say this out of experience 😉
Step 1.
Attach the two legs to the inside of each of the front legs. Attach the side with the 20 degree cut to the legs, the other side of the cut will be what goes on the ground.
Take one of the three brace pieces (24″) and run it through your table saw so that the top is cut at a 20-degree angle. This will allow your seat to sit flush without a gap at the front. That piece you will then attach to the top inside of the legs that you just screwed in.
One you have the front piece measure 18″ back from the front arm and attach the second brace. Keep the third brace piece for when you attach the back brace. Then add in the last of the three center braces behind them to secure and support the back brace.
Step 2.
Now measure from the top center of the chair down 8″ and mark the side of the chair. Then take the arm of the chair and attach it to the front arm on either side. Once it is attached you will line of the top of the arm to the 8″ line, although I do recommend double-checking everything with a label prior to attaching.
Step 3.
One you have the braces attached you can take the two back braces and attach them. Line one up with the bottom of the center brace and against the leg of the chair. Screw it in from the side first, then add a screw from the center brace to the back brace. Do this on both sides.
Step 4.
Once the frame is put together you can add the seat and back pieces and screw everything in. I do recommend sanding everything prior to the final attachment or you can sand it all in place.
Step 5.
Once your chair is built you can decide to either stain or paint your chair. Both will keep it protected long term, it is just a matter of the look you are going for.

I am SO happy with how they came out and next weekend I will be getting them sanded and prepped for paint. I would normally stain them, but I want to have a pop of color on the beach, and paint is a great way to make sure they stay protected.

Mathew Ross
• 4 years agoI had a question about the angles you cut on the top 2 boards.
The back rest (30.5″) and the legs (35.5″).
Look forward to building these chairs !
nicolewright
• 4 years agoI cant wait to see your build! For the legs and backrest, it is more based on the measurements of where I did the cuts (see the diagram) because you will need to hold the legs off the miter saw a bit as it can not cut the right angle. I can send you a picture if you would like because I am not sure that made sense 😉