
It feels more like a month since our last post, not 7 days! So much has happened in the last week it’s hard to keep track of if you missed out on week 2 and need to catch up you can read all about it here, or you can check out my weekly video update. Between a mile-long list of things to do, a busy work schedule, the weather throwing a few curveballs, and Glenn and the girls coming home with a surprise a lot was accomplished this week, including the demo of the bridge! It’s official and there is no turning back now.

This was a fun week for me because I got to start my first build for this One Room Challenge. Everything up until now has been about prep and planning but I have been dying to pull out my tools and smell some sawdust. Ready to see where we are at?
This is what we had planned for the week:
- Cut the top of the log flat (Glenn started it, does that count?)
Get 4 Adirondack chairs built- Sand the chairs
Demo the current bridge- Pour concrete for new bridge supports
Get baby chickens
Ok so that last one on the list was not part of my plan for the week, but on Friday morning I sent Glenn and the girls to the feed store to get goat food and guess what they came home with? Baby chicks! We had a hen go broody (she started laying on eggs to have babies) a few weeks ago on our patio so instead of her nesting on our porch for the next couple of months they came home with 2-day old babies and we did a sneaky thing and slipped them under her and she took to them instantly.


So on top of all the projects this week we now have not one (two week old kittens) but two sets of babies on the farm.
What We Did This Week
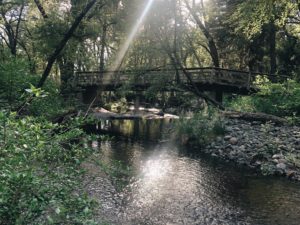
The Bridge is gone
I am excited/ scared/ in disbelief that the bridge we drive over every single day is officially gone. This is one of those projects that once you get going there is no turning back. The team arrived a day early to drop off the heavy equipment but due to the forecast decided to get moving on the demo a day early. So my mom and I were running around trying to get everything to the proper sides of the bridge since there would be no access for vehicles or heavy objects.

While the guys wasted no time and got right to work, my mom and I took advantage of the upcoming rain and cool weather and watched them work while we managed a burn pile of a bunch of brush and blackberry bushed from clearing the beach and my moms garden space.


New stairs for our log
Last week Glenn did a little chair saw handy work and made nice little steps for the temporary log bridge, however, we realized we needed something a little bigger and we also needed a set of steps on the other side, how else am I supposed to carry my Target haul over the bridge 😉

So I thought it was probably time to get him a little bigger saw than the 15″ one he has been using so we made a trip to our neighbor Stihl dealer and picked up a new BIG chain saw for him. No, it was not just to do the steps, last year PG&E took down 10 trees on our property, and let me tell you, there is a lot of chains saw work to be done.

The girls went ahead and modeled the new stairs for you all.
Building Adirondack Chairs
The last big project of the week was getting the Adirondack chairs built for the beach. Over the past month, I looked everywhere to find chairs that I liked the design of, and that would not break the bank. In the end, I could not find anything that fit the bill, so I started looking for plans to build my own. Again I hit a dead end because I was not in love with any of the designs available in the plans. So…

I decided to go ahead and design and build my own. As soon as I finished up with work on Friday I headed to my workshop aka my front porch and started piecing my designs together. I knew what I wanted the look to be, but had to figure out all of the measurements and angles to make it work.

It took me a few hours and putting together and taking apart the first chair approx. 237 times to nail it down. My goal was to get the cuts figured out so that Saturday morning I could get the remaining three chairs cut and put together before the rain hit on Sunday.

I am SO happy with how they came out and next weekend I will be getting them sanded and prepped for paint. I would normally stain them, but I want to have a pop of color on the beach, and paint is a great way to make sure they stay protected.


Now if you are like me and feel the need to build your own set of modern Adirondack chairs I have actually gone ahead and put together a tutorial and plan for you to make your own.
I am actually thinking I might make 4 more of them to put around the fire pit in the front yard because they are dang comfy. Once Sunday hit I was not able to get much done since the weather decided to hit Northern California with a crazy storm, but I was excited to get my first beach purchase in the mail. I ordered a portable fire pit for the beach which we will also be able to use for camping from Wayfair. It is going to be perfect on the beach in the coming months.
You can find the DIY Adirondack chair tutorial here.
Weekly Video Update
Other participants
Want to see what other participants are up to and how their spaces are coming along, make sure to check out the week 3 post on One Room Challenge. This is such a great bi-annual event put on and sponsored by Better Home and Gardens one of my all-time favorite publications.

Jenna Pilant of Room Bloom Design
• 4 years agoThose chairs 🙌 can’t wait to follow along and see the grand finale !
Dani
• 4 years agoWow! Amazing work. Those chairs are beautiful!